For our first dinner of 2015, Kim thought it would be fun if we made pasta together.
Kim made ricotta using this recipe (but substituting goat's milk).
Homemade Ricotta
As the milk mixture heats to 170°, be sure to stir gently and occasionally; if you stir too vigorously or too frequently (more than every few minutes), the curds may not separate as effectively from the whey. And don't stir after the milk mixture reaches 170°, or the cheese will become grainy and thin. If your kitchen sink has a gooseneck faucet, it might be difficult to hang the cheesecloth bag on it. If so, lay a long wooden spoon across one corner of the sink, and hang the bag on the handle.
Yield: about 3 cups
Ingredients:
1 gallon 2% reduced-fat milk
5 cups low-fat buttermilk
1/2 teaspoon sea salt
Preparation:
Line a large colander or sieve with 5 layers of dampened cheesecloth, allowing the cheesecloth to extend over outside edges of colander; place colander in a large bowl.
Combine milk and buttermilk in a large, heavy stockpot. Attach a candy thermometer to edge of pan so that thermometer extends at least 2 inches into milk mixture. Cook over medium-high heat until candy thermometer registers 170° (about 20 minutes), gently stirring occasionally. As soon as milk mixture reaches 170°, stop stirring (whey and curds will begin separating at this point). Continue to cook, without stirring, until the thermometer registers 190°. (Be sure not to stir, or curds that have formed will break apart.) Immediately remove pan from heat. (Bottom of pan may be slightly scorched.)
Using a slotted spoon, gently spoon curds into cheesecloth-lined colander; discard whey, or reserve it for another use. Drain over bowl for 5 minutes. Gather edges of cheesecloth together; tie securely. Hang cheesecloth bundle from kitchen faucet; drain 15 minutes or until whey stops dripping. Scrape ricotta into a bowl. Sprinkle with salt; toss gently with a fork to combine. Cool to room temperature.
Note: Store in refrigerator up to 4 days.
Cooking Light, April 2005
Micol Negrin
The ricotta was used for this filling:
Cheese Filling for Ravioli
from Weight Watchers Simply the Best: Italian
1/2 cup part-skim ricotta cheese
2 tablespoons grated Parmesan cheese
2 tablespoons minced flat-leaf parsley
1/2 egg white
1/4 teaspoon ground white pepper
1/8 teaspoon ground nutmeg
Combine the cheese, parsley, egg white, pepper and nutmeg.
For the pasta, she made this pumpkin pasta recipe.
Pumpkin Pasta Dough
from The Glorious Pasta of Italy by Domenica Marchetti
Fresh egg noodles in Italy are a gorgeous, rich golden color that is hard to replicate elsewhere. This is because of the intense red of the yolks (indeed, in Italy the yolk is referred to as il rosso, “the red”). I’m still not sure what inspired me one day to add just a little bit of pumpkin puree to my pasta dough—actually it was buttercup squash, which has sweet, dense, deep orange flesh. I happened to have some leftover in my fridge from a pumpkin cheesecake that I had made for Thanksgiving. Into the dough it went. The resulting pasta sheets were even better than I had imagined, golden in color and subtle in flavor—a perfect match for pumpkin lasagne. But you can also cut them into pappardelle or fettuccine and serve them with a simple tomato sauce.–Domenica Marchetti
Ingredients:
1/3 cup puréed cooked pumpkin or winter squash, such as buttercup or kabocha (or substitute canned pumpkin puree)
2 large or extra-large eggs
2 to 2 1/4 cups “00” flour or unbleached all-purpose flour
2 tablespoons semolina flour, plus more for the work surface
3/4 teaspoon fine sea salt
Pinch freshly grated nutmeg
Directions:
1. In a small bowl, whisk together the pumpkin and 1 of the eggs.
2. Place 2 cups “00” flour, the semolina flour, salt, and nutmeg in a food processor. Pulse briefly to combine. Add the pumpkin-egg mixture and pulse briefly. Add the remaining egg and pulse until the mixture forms crumbs that look like small curds. Pinch together a bit of the mixture and roll it around. It should form a soft ball. If the mixture seems dry, drizzle in a few droplets of water and pulse briefly. If it seems too wet and sticky, add additional flour, 1 tablespoon at a time, and pulse briefly.
3. Turn the mixture onto a clean work surface sprinkled lightly with semolina flour and press it together with your hands to form a rough ball. Knead the dough by using the palm of your hand to push the dough gently but firmly away from you, and then fold it over toward you. Rotate the dough a quarter turn, and repeat the pushing and folding motion. Continue kneading for several minutes until the dough is smooth. Form it into a ball and wrap it tightly in plastic wrap. Let the dough rest at room temperature for 30 minutes before shaping into your desired shape pasta.
4. To form lasagne noodles, stretch the dough as thin as you comfortably can, no thicker than 1/16 inch. If you lift a sheet with your hand, you should be able to see the shadow of your hand through it. Because lasagne noodles are layered, they need to be very thin. Using a sharp chef’s or similar knife, cut each sheet into rectangles about 4 inches by 5 inches.
We started by putting the dough through the pasta machine a couple of times at the largest setting, then we turned the dial to a smaller setting and put the dough through again. We continued to pass the dough through increasingly smaller settings until it was thin enough to make the ravioli


Dip: Mince the garlic in a food processor. Add the chickpeas, lemon juice, 2 tablespoons water, salt, and pepper. Process until the mixture is almost smooth. With the machine running, gradually blend in the oil. Process until the mixture is completely smooth, scraping down the sides of the work bowl occasionally. Add the sun-dried tomatoes and dried herbs. Blend until the tomatoes and herbs are finely chopped. (The dip can be made 1 day ahead. Cover and refrigerate.) To serve, spoon 1 teaspoon of the dip on each crostini, and garnish with the lemon zest or fresh herbs.
Dani made two kinds of gnocchi

Winter Squash Gnocchi with Brown Butter and Sage
from Foodandwine.com
Note: I actually served this with a beet green pesto instead of the brown butter sauce.
1 head of garlic, top third cut off
Extra-virgin olive oil, for rubbing
1 pound baking potatoes
One 2-pound butternut squash—peeled, seeded and cut into 2-inch pieces
2 large egg yolks, at room temperature
1/4 cup fresh ricotta cheese
2 tablespoons minced flat-leaf parsley
Kosher salt
1 1/4 cups all-purpose flour, plus more for dusting
1 stick unsalted butter
10 sage leaves, thinly sliced
1 tablespoon fresh thyme, finely chopped
Parmigiano-Reggiano shavings, for serving
1. Preheat the oven to 375º. Place racks in the lower and middle thirds of the oven. Drizzle the garlic with olive oil, wrap it tightly in foil and roast on the bottom rack of the oven for 50 minutes. Lightly rub the potatoes with olive oil, prick them all over with a fork and bake on the lower rack for 45 minutes, until fork-tender. Line a large baking sheet with foil. Add the squash and rub with olive oil. Bake on the upper rack for about 30 minutes, stirring once, until soft.
2. Squeeze the roasted garlic cloves out of their skins into a small bowl and mash to a paste. Peel the hot potatoes and pass them through a ricer into a large bowl. Add the hot squash to the ricer and pass it into the bowl with the potatoes. Let cool slightly. Add the egg yolks, ricotta, parsley, 1 tablespoon of salt and 1 tablespoon of the mashed roasted garlic (reserve any extra for another use). Stir until combined. Sprinkle on the 1 1/4 cups of flour and gently stir it in. Scrape the dough onto a floured surface and knead gently until smooth but still slightly sticky.
3. Line a baking sheet with wax paper and dust with flour. Cut the gnocchi dough into 5 pieces and roll each piece into a 3/4-inch-thick rope. Cut the ropes into 1/2-inch pieces and transfer the gnocchi to the baking sheet.
4. Lightly oil another baking sheet. In a large, deep skillet of simmering salted water, cook half of the gnocchi until they rise to the surface, then simmer them for 1 to 2 minutes longer, until cooked through. Using a slotted spoon, transfer the gnocchi to the baking sheet. Repeat with the remaining gnocchi.
5. In a large nonstick skillet, melt the butter over moderate heat and cook until golden brown, about 2 minutes. Add the sage and thyme and cook for 20 seconds. Add the gnocchi and cook for 1 minute, tossing gently. Season with salt and serve, passing the cheese shavings at the table.
Make Ahead The gnocchi can be prepared through Step 3 and frozen on the baking sheet, then transferred to a resealable plastic bag and frozen for up to 1 month. Boil without defrosting.


Kim made ricotta using this recipe (but substituting goat's milk).
Homemade Ricotta
As the milk mixture heats to 170°, be sure to stir gently and occasionally; if you stir too vigorously or too frequently (more than every few minutes), the curds may not separate as effectively from the whey. And don't stir after the milk mixture reaches 170°, or the cheese will become grainy and thin. If your kitchen sink has a gooseneck faucet, it might be difficult to hang the cheesecloth bag on it. If so, lay a long wooden spoon across one corner of the sink, and hang the bag on the handle.
Yield: about 3 cups
Ingredients:
1 gallon 2% reduced-fat milk
5 cups low-fat buttermilk
1/2 teaspoon sea salt
Preparation:
Line a large colander or sieve with 5 layers of dampened cheesecloth, allowing the cheesecloth to extend over outside edges of colander; place colander in a large bowl.
Combine milk and buttermilk in a large, heavy stockpot. Attach a candy thermometer to edge of pan so that thermometer extends at least 2 inches into milk mixture. Cook over medium-high heat until candy thermometer registers 170° (about 20 minutes), gently stirring occasionally. As soon as milk mixture reaches 170°, stop stirring (whey and curds will begin separating at this point). Continue to cook, without stirring, until the thermometer registers 190°. (Be sure not to stir, or curds that have formed will break apart.) Immediately remove pan from heat. (Bottom of pan may be slightly scorched.)
Using a slotted spoon, gently spoon curds into cheesecloth-lined colander; discard whey, or reserve it for another use. Drain over bowl for 5 minutes. Gather edges of cheesecloth together; tie securely. Hang cheesecloth bundle from kitchen faucet; drain 15 minutes or until whey stops dripping. Scrape ricotta into a bowl. Sprinkle with salt; toss gently with a fork to combine. Cool to room temperature.
Note: Store in refrigerator up to 4 days.
Cooking Light, April 2005
Micol Negrin
The ricotta was used for this filling:
Cheese Filling for Ravioli
from Weight Watchers Simply the Best: Italian
1/2 cup part-skim ricotta cheese
2 tablespoons grated Parmesan cheese
2 tablespoons minced flat-leaf parsley
1/2 egg white
1/4 teaspoon ground white pepper
1/8 teaspoon ground nutmeg
Combine the cheese, parsley, egg white, pepper and nutmeg.
For the pasta, she made this pumpkin pasta recipe.
Pumpkin Pasta Dough
from The Glorious Pasta of Italy by Domenica Marchetti
Fresh egg noodles in Italy are a gorgeous, rich golden color that is hard to replicate elsewhere. This is because of the intense red of the yolks (indeed, in Italy the yolk is referred to as il rosso, “the red”). I’m still not sure what inspired me one day to add just a little bit of pumpkin puree to my pasta dough—actually it was buttercup squash, which has sweet, dense, deep orange flesh. I happened to have some leftover in my fridge from a pumpkin cheesecake that I had made for Thanksgiving. Into the dough it went. The resulting pasta sheets were even better than I had imagined, golden in color and subtle in flavor—a perfect match for pumpkin lasagne. But you can also cut them into pappardelle or fettuccine and serve them with a simple tomato sauce.–Domenica Marchetti
Ingredients:
1/3 cup puréed cooked pumpkin or winter squash, such as buttercup or kabocha (or substitute canned pumpkin puree)
2 large or extra-large eggs
2 to 2 1/4 cups “00” flour or unbleached all-purpose flour
2 tablespoons semolina flour, plus more for the work surface
3/4 teaspoon fine sea salt
Pinch freshly grated nutmeg
Directions:
1. In a small bowl, whisk together the pumpkin and 1 of the eggs.
2. Place 2 cups “00” flour, the semolina flour, salt, and nutmeg in a food processor. Pulse briefly to combine. Add the pumpkin-egg mixture and pulse briefly. Add the remaining egg and pulse until the mixture forms crumbs that look like small curds. Pinch together a bit of the mixture and roll it around. It should form a soft ball. If the mixture seems dry, drizzle in a few droplets of water and pulse briefly. If it seems too wet and sticky, add additional flour, 1 tablespoon at a time, and pulse briefly.
3. Turn the mixture onto a clean work surface sprinkled lightly with semolina flour and press it together with your hands to form a rough ball. Knead the dough by using the palm of your hand to push the dough gently but firmly away from you, and then fold it over toward you. Rotate the dough a quarter turn, and repeat the pushing and folding motion. Continue kneading for several minutes until the dough is smooth. Form it into a ball and wrap it tightly in plastic wrap. Let the dough rest at room temperature for 30 minutes before shaping into your desired shape pasta.
4. To form lasagne noodles, stretch the dough as thin as you comfortably can, no thicker than 1/16 inch. If you lift a sheet with your hand, you should be able to see the shadow of your hand through it. Because lasagne noodles are layered, they need to be very thin. Using a sharp chef’s or similar knife, cut each sheet into rectangles about 4 inches by 5 inches.
We started by putting the dough through the pasta machine a couple of times at the largest setting, then we turned the dial to a smaller setting and put the dough through again. We continued to pass the dough through increasingly smaller settings until it was thin enough to make the ravioli
Putting pasta through the machine
filled and cut
ready to be boiled for 3 minutes
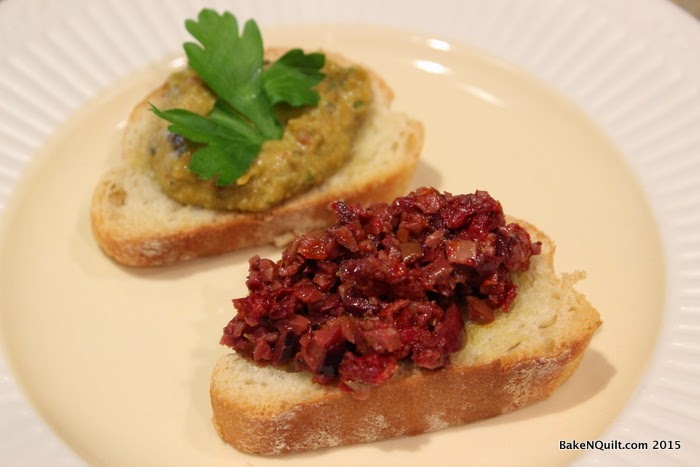
Rebecca brought appetizers for us to munch on while we worked.
Crostini with Sun-Dried Tomatoes and Chickpeas
From Everyday Italian by Giada De Laurentiis
Crostini:
1 baguette, cut into 24 diagonal slices 1/3-inch thick
2 tablespoons olive oil
2 tablespoons olive oil
Dip:
1 large garlic clove
1 (15½ ounce) can chickpeas (garbanzo beans), drained and rinsed
3 tablespoons fresh lemon juice
½ teaspoon salt
½ teaspoon ground pepper
¼ cup olive oil
¼ cup oil-packed sun-dried tomatoes, drained and coarsely chopped
1/4 cup fresh basil leaves
1/4 cup fresh Italian parsley leaves
Crostini: Preheat the oven to 375º. Place the baguette slices in a single layer on a baking sheet, and lightly brush with oil. Toast in the oven until golden, about 8 minutes. (You can toast the bread 1 day ahead. Cool, then store airtight at room temperature.)
Dip: Mince the garlic in a food processor. Add the chickpeas, lemon juice, 2 tablespoons water, salt, and pepper. Process until the mixture is almost smooth. With the machine running, gradually blend in the oil. Process until the mixture is completely smooth, scraping down the sides of the work bowl occasionally. Add the sun-dried tomatoes and dried herbs. Blend until the tomatoes and herbs are finely chopped. (The dip can be made 1 day ahead. Cover and refrigerate.) To serve, spoon 1 teaspoon of the dip on each crostini, and garnish with the lemon zest or fresh herbs.
Olive and Sun-dried Tomato Tapenade with Endive Leaves
From Everyday Italian by Giada De Laurentiis
3 (8-ounce) cans of pitted Kalamata olives, drained
3/4 cup sun-dried tomatoes packed in olive oil
Extra-virgin olive oil
3/4 cup sun-dried tomatoes packed in olive oil
Extra-virgin olive oil
3 heads endive (about 1/2 pound)
In the bowl of a food processor, add the olives, sun-dried tomatoes
and the olive oil it was packed in. Pulse until smooth, but still
chunky. Add more extra-virgin olive oil if mixture is too dry. Spoon
into a serving bowl. If not serving immediately, cover tightly with
plastic wrap and refrigerate up to 2 days. Be sure to bring it to room
temperature and to mix it thoroughly before serving.
Gently pull off the leaves from the endive, being carefully not to tear the leaves. Wash thoroughly with cold water and dry completely.
Place the bowl of tapenade in the center of a large platter. Decoratively circle the tapenade bowl with the endive leaves working your way to the rim of the platter.
Winter Squash Gnocchi with Brown Butter and Sage
from Foodandwine.com
Note: I actually served this with a beet green pesto instead of the brown butter sauce.
1 head of garlic, top third cut off
Extra-virgin olive oil, for rubbing
1 pound baking potatoes
One 2-pound butternut squash—peeled, seeded and cut into 2-inch pieces
2 large egg yolks, at room temperature
1/4 cup fresh ricotta cheese
2 tablespoons minced flat-leaf parsley
Kosher salt
1 1/4 cups all-purpose flour, plus more for dusting
1 stick unsalted butter
10 sage leaves, thinly sliced
1 tablespoon fresh thyme, finely chopped
Parmigiano-Reggiano shavings, for serving
1. Preheat the oven to 375º. Place racks in the lower and middle thirds of the oven. Drizzle the garlic with olive oil, wrap it tightly in foil and roast on the bottom rack of the oven for 50 minutes. Lightly rub the potatoes with olive oil, prick them all over with a fork and bake on the lower rack for 45 minutes, until fork-tender. Line a large baking sheet with foil. Add the squash and rub with olive oil. Bake on the upper rack for about 30 minutes, stirring once, until soft.
2. Squeeze the roasted garlic cloves out of their skins into a small bowl and mash to a paste. Peel the hot potatoes and pass them through a ricer into a large bowl. Add the hot squash to the ricer and pass it into the bowl with the potatoes. Let cool slightly. Add the egg yolks, ricotta, parsley, 1 tablespoon of salt and 1 tablespoon of the mashed roasted garlic (reserve any extra for another use). Stir until combined. Sprinkle on the 1 1/4 cups of flour and gently stir it in. Scrape the dough onto a floured surface and knead gently until smooth but still slightly sticky.
3. Line a baking sheet with wax paper and dust with flour. Cut the gnocchi dough into 5 pieces and roll each piece into a 3/4-inch-thick rope. Cut the ropes into 1/2-inch pieces and transfer the gnocchi to the baking sheet.
4. Lightly oil another baking sheet. In a large, deep skillet of simmering salted water, cook half of the gnocchi until they rise to the surface, then simmer them for 1 to 2 minutes longer, until cooked through. Using a slotted spoon, transfer the gnocchi to the baking sheet. Repeat with the remaining gnocchi.
5. In a large nonstick skillet, melt the butter over moderate heat and cook until golden brown, about 2 minutes. Add the sage and thyme and cook for 20 seconds. Add the gnocchi and cook for 1 minute, tossing gently. Season with salt and serve, passing the cheese shavings at the table.
Make Ahead The gnocchi can be prepared through Step 3 and frozen on the baking sheet, then transferred to a resealable plastic bag and frozen for up to 1 month. Boil without defrosting.
Gnocchi with Squash & Sweet Corn
from Thekitchn.com
1 (16 ounce) package vacuum-sealed gnocchi (from the dried pasta aisle) (see recipe for Gnocchi below)
4 tablespoons unsalted butter, divided
1 small zucchini, very thinly sliced
1 small yellow squash, very thinly sliced
1 cup sweet yellow corn kernels (from about two ears)
2 small cloves garlic, peeled and minced
Squeeze of lemon
2 ounces soft goat cheese
1 tablespoon finely chopped flat leaf parsley
Salt and pepper, to taste
Bring a pot of water to a boil. Add gnocchi and cook for 2 minutes. Drain and return to the pot. Toss warm gnocchi with 1 tablespoon butter and set aside.
Meanwhile, melt remaining 3 tablespoons of butter in a large, flat-sided sauté pan over medium heat. Cook the butter until it begins to bubble and turn light golden brown, about 3 minutes. Be careful not to let it burn. Add the zucchini, squash, corn, and garlic and sauté until warmed through, another 2 - 3 minutes.
Turn off heat and stir the cooked gnocchi into the vegetables. Add a generous squeeze of lemon juice, and salt and pepper to taste. Transfer to a serving bowl and top with small hunks of goat cheese and a sprinkling of chopped parsley.
Home Made Gnocchi
from Thekitchn.com
3 pounds all-purpose potatoes
1 egg
2 teaspoons salt
1 to 2 cups flour
1. Fill the saucepan with water, and stir in 1 tablespoon salt. Add the potatoes. Boil the potatoes, in their skins, until they are nearly falling apart.
2. Drain the potatoes and let them cool just until they can be handled (about 5 to 10 minutes).
3. Use a towel, a paper towel, or a spoon to rub or scrape the skin off the potatoes.
4. Now rice or mash the potatoes as finely as you can into a large bowl. We did not have a ricer or a food mill, and so we simply mashed the potatoes with a masher and a fork. This left some rather large lumps, and we realized afterwards that we could have pressed the potatoes through a colander. (It's OK, though, if your potatoes aren't perfectly fine; you'll end up with a more rustic, lumpy dough, but they'll still be delicious.)
5. Stir the salt and egg into the mashed potatoes.
6. Spread the flour out on a kneading surface and turn the potato mixture out on top. Knead it together with your hands, adding more flour as you go, if necessary.
7. Depending on how much moisture was in your potatoes, you may need to add up to a cup of flour.
8. There is a lot of variability in potatoes, so simply add until the dough feels mostly smooth, and just slightly sticky.
9. Cut the dough into quarters, and then divide each quarter into four pieces. Roll each piece into a long, 1-inch-wide rope.
10. Cut the rope into walnut-sized pillows. You can leave the pieces as is, or you can roll them over the back of a fork to create ridges.
11. To form the ridges on the gnocchi, take a bite-sized pillow of dough, and roll it down and off the tines of a fork. Don't worry if they look lumpy or rustic! These are not meant to look perfectly shaped; they are usually a little uneven (at least, ours always are). Place the finished gnocchi on a baking pan dusted with flour, and sprinkle a little flour over top.
12. To cook the gnocchi, heat a saucepan of salted water to boiling. Add the gnocchi and cook. They will float to the top of the pan as they cook. Cook for about 2 minutes after they float to the top. (About 4 minutes cooking time total, depending on their size.)
I (Katharina) made a meat sauce for the pasta;
This recipe for "sugo di carne"(meat sauce) came from The Fine Art of Italian Cooking by Giuliano Bugialli
1 oz dried porcini mushrooms
1 carrot, scraped
1 celerey rib
1 med. red onion, cleaned
8 sprigs Italian parsley, leaves only
1 large clove garlic, peeled
Small piece of lemon peel
1/4 cup olive oil
1/2 pound beef sirloin, in one piece
1/2 cup dry red wine
Salt and freshly ground pepper
1 pound canned plum tomatoes (imported Italian if possible), drained
1 Tbsp tomato paste (imported Italian, if possible)
2 cups hot meat or chicken broth, preferably homemade
Soak the mushrooms in 2 cups of lukewarm water for 20 minutes.
Finely chop the carrot, celery, onion, parsley, garlic, and lemon peel. Heat oil in a flameproof casserole (preferably terra-cotta), then add chopped ingredients. Saute very gently until golden (about 15 to 20 minutes).
With scissors, snip the meat into tiny pieces and add to the contents of the casserole. (The authentic sauce uses snipped pieces of meat rather than ground meat; this way the pieces retain their identity and flavor instead of amalgamating into a homogenous mixture.) Saute the meat pieces for 12 to 15 minutes, then add the wind and cook unitl it evaporates (15 to 20 minutes).
Taske for salt and pepper, then add the tomatoes and tomato paste and let cook very slowly for 20 to 25 minutes.
Drain the soaked mushrooms, reserving the soaking liquid. Rinse mushrooms, removing sand attached to the stems. Strain mushroom water several times through paper towels to remove sand.
Add the mushrooms to the sauce and simmer very slowly for at least 1 1/2 hours, adding hot broth and the mushroom water as liquid is needed, until all the broth and mushroom water have been added. (The sauce should be of medium thickness, neither too liquid nor too dense.)
I made the following changes: Used mixed dried mushrooms instead of porcini only (which I couldn't find at the store); used a shallot instead of a red onion; used regular parsley instead of flat-leaf; and I cut the meat with a knife instead of scissors into roughly 1/8 - 1/4 inch chunks, which worked very well as the meat was still partly frozen. I used domestic tomato paste and store-bought chicken broth.
The flavour came out a little too mushroomy for my taste. If doing it again, I would omit the mushrooms or just use some button mushrooms. But I really liked the way the meat came out.
Lauren made a salad
Sara brought tiramisu for dessert
Sara's Tiramisu'
This tiramisu' is a family recipe and it is not the traditional Italian one. But it is definitely our favorite at home!
It has no alchool and you can make it with decaf coffee to enjoy it with children or without coffee at all and use some milk to soften the savoiardi (ladyfingers).
It has no alchool and you can make it with decaf coffee to enjoy it with children or without coffee at all and use some milk to soften the savoiardi (ladyfingers).
Ingredients (for 10 servings):
- 2 boxes of mascarpone cheese of 8 OZ each.
- 5 eggs.
- 200 grams (approx 8OZ) sugar.
- 150 grams of dark chocolate (NO Hershey! Lindt,
Ghirardelli would do, only dark though).
- One/two packages of savoiardi cookies (ladyfingers, I think the cheapest ones are at the Milk Pail).
- 1 bowl of cold coffee slightly sweetened, espresso better
but American coffee works too.
- Cocoa powder unsweetened for garnishing.
Preparation:
1. Chop coarsely the chocolate and set aside.
2. In a bowl mix the mascarpone cheese and the egg yolks
until the mixture is creamy and smooth.
2. In a bowl whip the egg whites and the sugar until really
stiff, the firmer the better.
3. With a big table spoon slowly add the beaten egg whites
to the mascarpone cheese/yolk cream. Mix slowly with a upward movement of the
spoon as to incorporate air in the mixture and avoiding undoing the whipping of
the egg whites. Proceed this way until all the egg white mix is finished.
4. Add the chopped chocolate to the cream, still mixing
slowly.
5. Get a nice serving dish (a bowl or a 4 inches deep baking
pan will do).
6. In a deep dish pour some of the coffee then dip two
savoiardi cookies for few seconds on one side and then turn them on the other
side. Avoid soaking them too long, even if they look still dry they absorb the
coffee really fast.
7. Cover the bottom of the serving dish with the coffee wet cookies.
8. Pour a layer of the cream on top and distribute it
evenly.
9. Make another layer of wet cookies and proceed until the
cream is finished. Generally I only make 2 layers of cookies and 2 of cream.
10. With a fine strainer sprinkle the top of the tiramisu'
with cocoa powder. The top can be decorated with coffee soaked savoiardi
cookies cut in different shapes and arranged or whipped cream puffs. Be
creative but do not over do it!
11. Refrigerate one hour or until ready to serve. This
dessert contains uncooked eggs so it is imperative to keep it in the fridge at
all times and to consume it within 3 days after making it.